What's new

[How-To] Link Aggregation/LACP on RT-AC68U/W/R/P

  • Thread starter Deleted member 28123
  • Start date
  • SNBForums Code of Conduct

    SNBForums is a community for everyone, no matter what their level of experience.

    Please be tolerant and patient of others, especially newcomers. We are all here to share and learn!

    The rules are simple: Be patient, be nice, be helpful or be gone!

Thank you AtAM1 for the LAG setup instruction.

I have a Synology DS713+ NAS connected to ports 3 and 4 of an ASUS rt-ac68u, everything works fine with the LAG setup and the link is working. The only problem is SMB CIFS is not working anymore after the LAG setup, I cannot even connect to my NAS on local LAN in windows explorer by entering the ip address in the format \\xx.xx.xx.xx SMB works fine after I have removed the LAG setup from the router.

Would someone shed some light on this? Thank you.
 
SMB/CIFS/AFP/Rsync/NFS all work fine here.. Can you provide the status output of your bond0 interface for both the router and Synology device as well as the output of the following:

>> nvram show | grep vlan
>> iptables -vnL INPUT

* To find out the bond0 status for the router, run:

>> cat /proc/net/bonding/bond0

I'm not sure what it is for the synology.
 
Here is the result,

>> nvram show | grep vlan
>> iptables -vnL INPUT

Code:
/jffs/scripts$ nvram show | grep vlan
size: 49843 bytes (15693 left)
vlan4ports=3 5t
vlan2ports=0 5u
wl0_vlan_prio_mode=off
vlan2hwname=et0
vlan5hwname=et0
wl_vlan_prio_mode=off
lan_ifnames=vlan1 eth1 eth2 wl0.1
vlan5ports=4 5t
vlan1hwname=et0
vlan1ports=1 2 3 4 5*
vlan4hwname=et0
landevs=vlan1 wl0 wl1
wl1_vlan_prio_mode=off
/jffs/scripts$ iptables -vnL INPUT
Chain INPUT (policy ACCEPT 0 packets, 0 bytes)
 pkts bytes target     prot opt in     out     source               destination         
    0     0 ACCEPT     all  --  tun21  *       0.0.0.0/0            0.0.0.0/0           
    0     0 ACCEPT     udp  --  *      *       0.0.0.0/0            0.0.0.0/0            udp dpt:1194
    0     0 ACCEPT     all  --  vlan5  *       0.0.0.0/0            0.0.0.0/0           
    0     0 ACCEPT     all  --  vlan4  *       0.0.0.0/0            0.0.0.0/0           
    0     0 ACCEPT     all  --  bond0  *       0.0.0.0/0            0.0.0.0/0           
   32  2042 DROP       all  --  *      *       0.0.0.0/0            0.0.0.0/0            state INVALID
 4357  611K ACCEPT     all  --  *      *       0.0.0.0/0            0.0.0.0/0            state RELATED,ESTABLISHED
   87 21677 ACCEPT     all  --  lo     *       0.0.0.0/0            0.0.0.0/0            state NEW
  337 48089 ACCEPT     all  --  br0    *       0.0.0.0/0            0.0.0.0/0            state NEW
    0     0 ACCEPT     udp  --  *      *       0.0.0.0/0            0.0.0.0/0            udp spt:67 dpt:68
    0     0 ACCEPT     tcp  --  *      *       0.0.0.0/0            10.168.123.1         tcp dpt:80
  461 23972 ACCEPT     tcp  --  *      *       0.0.0.0/0            10.168.123.1         tcp dpt:8443
    3   452 ACCEPT     tcp  --  eth0   *       0.0.0.0/0            0.0.0.0/0            tcp dpt:1024
   55  3611 DROP       all  --  *      *       0.0.0.0/0            0.0.0.0/0

* To find out the bond0 status for the router, run:

>> cat /proc/net/bonding/bond0

Code:
/jffs/scripts$ cat /proc/net/bonding/bond0
Ethernet Channel Bonding Driver: v3.7.0 (June 2, 2010)

Bonding Mode: IEEE 802.3ad Dynamic link aggregation
Transmit Hash Policy: layer3+4 (1)
MII Status: up
MII Polling Interval (ms): 50
Up Delay (ms): 0
Down Delay (ms): 0

802.3ad info
LACP rate: fast
Aggregator selection policy (ad_select): stable
Active Aggregator Info:
	Aggregator ID: 1
	Number of ports: 2
	Actor Key: 5
	Partner Key: 17
	Partner Mac Address: 00:11:32:19:46:87

Slave Interface: vlan4
MII Status: up
Link Failure Count: 0
Permanent HW addr: bc:ee:7b:de:88:e8
Aggregator ID: 1
Slave queue ID: 0

Slave Interface: vlan5
MII Status: up
Link Failure Count: 0
Permanent HW addr: bc:ee:7b:de:88:e8
Aggregator ID: 1
Slave queue ID: 0

bond0 for the Diskstation

Code:
DiskStation> cat /proc/net/bonding/bond0
Ethernet Channel Bonding Driver: v3.7.1 (April 27, 2011)

Bonding Mode: IEEE 802.3ad Dynamic link aggregation
Transmit Hash Policy: layer2 (0)
MII Status: up
MII Polling Interval (ms): 100
Up Delay (ms): 100
Down Delay (ms): 0

802.3ad info
LACP rate: fast
Min links: 0
Aggregator selection policy (ad_select): stable
Active Aggregator Info:
        Aggregator ID: 1
        Number of ports: 2
        Actor Key: 17
        Partner Key: 5
        Partner Mac Address: bc:ee:7b:de:88:e8

Slave Interface: eth0
Speed: 1000
Duplex: full
MII Status: up
Speed: 1000 Mbps
Duplex: full
Link Failure Count: 10
Permanent HW addr: 00:11:32:19:46:87
Aggregator ID: 1
Slave queue ID: 0

Slave Interface: eth1
Speed: 1000
Duplex: full
MII Status: up
Speed: 1000 Mbps
Duplex: full
Link Failure Count: 9
Permanent HW addr: 00:11:32:19:46:88
Aggregator ID: 1
Slave queue ID: 0
DiskStation>

Thank you for the help.
 
There is a mismatch in the MII Polling Interval and Transmit Hash Policy - You are using 50ms / Layer3+4 (1) on your router and 100ms / Layer2 (0) on your Synology...

You have 2 options:

Option 1

Change your router's hash policy to Layer2 (0) and polling interval to 100ms by amending the following lines in the script:

Code:
echo 0 > /sys/class/net/bond0/bonding/xmit_hash_policy
Code:
echo 100 > /sys/class/net/bond0/bonding/miimon

Reboot

Option 2

Change your Synology's hash policy to Layer3+4 and polling interval to 50ms by running/including the following in Synology's shell/startup script or modifying your bonding conf file:

Code:
echo 1 > /sys/class/net/bond0/bonding/xmit_hash_policy
Code:
echo 50 > /sys/class/net/bond0/bonding/miimon

Then run >> cat /proc/net/bonding/bond0 to verify whether it was applied correctly.

Test and confirm.
 
Last edited by a moderator:
The settings worked and things get improved. All PCs connected to the wired port of the ASUS router could access the NAS via SMB. PCs connected via wifi, however, still out of luck. Any idea?

Thank you.
 
OP, since you want this to be a how-to, please consider performance.

The one that I see is that the in iptables,
the rules with "RELATED,ESTABLISHED" and "INVALID" should be first if possible.
Therefore your inserts should be at 3 or more.

Thanks
 
@coldwizard - could you please explain your last comment in a bit more detail (regarding the use/order of RELATED,ESTABLISHED and "INVALID" statements) when it comes to increasing performance? Any link/info which might better clarify this would be very much appreciated. CH
 
the rules with "RELATED,ESTABLISHED" and "INVALID" should be first if possible.

Therefore your inserts should be at 3 or more.

I would have to drop all INPUT/FORWARD chain rules created by Asus's firmware/services ie. vpn, external ports etc. including the custom ones and recreate them from scratch in order to have the first (INVALID) and second (RELATED,ESTABLISHED) rules listed at the top... not worth the effort as it should be fixed at the source code level.
 
@coldwizard - could you please explain your last comment in a bit more detail (regarding the use/order of RELATED,ESTABLISHED and "INVALID" statements) when it comes to increasing performance? Any link/info which might better clarify this would be very much appreciated. CH

The rules are processed top down, so you want to reduce the number of rules tested. The RELATED,ESTABLISHED rule says allow existing connections, so near the top allows existing connections maximum performance.
The INVALID rule checks packets for known bad packets that can cause trouble see http://security.blogoverflow.com/2011/08/base-rulesets-in-iptables/ for examples

This link gives an example of the performance hit.

http://www.dd-wrt.com/phpBB2/viewtopic.php?t=69050
 
I would have to drop all INPUT/FORWARD chain rules created by Asus's firmware/services ie. vpn, external ports etc. including the custom ones and recreate them from scratch in order to have the first (INVALID) and second (RELATED,ESTABLISHED) rules listed at the top... not worth the effort as it should be fixed at the source code level.

Actually, if the generated tables place rules before the established state, you could assume they are required to be there for some reason. Anything that turns off hardware acceleration is likely needing to check each packet of a connection for something, so that check must come before the rule for established connections.


All you need to do is insert your new rules after the rule containing RELATED,ESTABLISHED.

Edit: If too hard to find insert point by script, an idea would be to put a comment in that the rules should be inserted after the RELATED,ESTABLISHED and make a variable that contains the insert point.
 
Last edited:
Actually, if the generated tables place rules before the established state, you could assume they are required to be there for some reason. Anything that turns off hardware acceleration is likely needing to check each packet of a connection for something, so that check must come before the rule for established connections.

Thanks for sharing the links in your previous post... a 5 Mbits/s improvement cannot be ignored especially when we are trying to squeeze as much performance out of our consumer-grade routers. I don't think Asus is aware of this tweak otherwise they would have implemented it in their source code/firmware.

My weekend starts today so I'll invest some time going over the source code for the firewall and should I come up with a working patch, I'll share it with @RMerlin so it can be included.

For now though, I came up with the following to be included at the top (not bottom as I have previously written) of the firewall-start script (credit to Diosbejgli and others from DD-WRT forums and @coldwizard for bringing it up) :

Code:
# Firewall/IPtables Performance Tweak
iptables -D INPUT `iptables --line-numbers -nL INPUT | grep ESTABLISHED | tail -n1 | awk '{print $1}'`
iptables -I INPUT -m state --state RELATED,ESTABLISHED -j ACCEPT

I also made changes to the link aggregation firewall rules (should precede the above rules):

Code:
# Bonding
iptables -I INPUT -i vlan4 -j ACCEPT
iptables -I INPUT -i vlan5 -j ACCEPT
iptables -I INPUT -i bond0 -j ACCEPT

I will test this further when I reach home and will update my initial post accordingly.

Thanks again.

Update: Had all sorts of issues after changing the position of the RELATED,ESTABLISHED rule in the FORWARD chain and all Asus services should precede the RELATED,ESTABLISHED rule in the INPUT chain.
 
Last edited by a moderator:
Just tested again on my end and I was able to access my NAS via IP on a laptop running windows whilst connected to the wifi... strange! All devices behind the bond0 interface are appearing in my network neighborhood.

Are you able to ping the NAS via the IP? Also, what's the output of >> brctl show

Basically not able to ping the NAS via IP

Output of brctl show
Code:
/jffs/scripts$ brctl show
bridge name	bridge id		STP enabled	interfaces
br0		8000.bcee7bde88e8	yes		vlan1
							eth1
							eth2
							wl0.1
							bond0

Thank you.
 
Same setup waiting for a fix - RT-AC87U and DS-412+

Hello All,

I have been trying to get LAG working with Synology NAS DS-412+ and RT-AC87U.

I have contacted ASUS, and their tech support, level 1 crew, are absolutely clueless. I have only received one email from VIP Support, and they seem to be even less willing to work with me on an "Unsupported feature."

I explained this feature is on the internet, and even on the box. It is the main reason I purchased this router.

I am trying to figure this out before my return period ends for the router.

Please, if anyone has gotten this to work with the NAS, let me know.

Thanks Everyone,
bluegrassbandit42
 
I have contacted ASUS, and their tech support, level 1 crew, are absolutely clueless. I have only received one email from VIP Support, and they seem to be even less willing to work with me on an "Unsupported feature."

I explained this feature is on the internet, and even on the box. It is the main reason I purchased this router.
It looks like this feature was never implemented. I'd return the router and buy a different brand if I were you. :(

http://www.smallnetbuilder.com/forums/showpost.php?p=144478&postcount=79
http://pcdiy.asus.com/2014/08/august-2014-the-best-802-11ac-router-rt-ac87u-rt-ac87r/
 
Thanks for the reply - beyond the return period now...

Thanks Colin,

I appreciate the advice, and unfortunately, I am beyond the return period.

I have just connected my NAS to a LAG enabled switch, and connected it to the router.

I was just hoping to connect directly to the router for better performance.

Maybe Merlin, or even ASUS with enough complaining, will implement this feature for direct connection to the router.

Thank you again,
bluegrassbandit42
 
Hello everyone -

I managed to get link aggregation working with the 68u router model and wanted to share my method in this how-to guide.

Environment

- Router Model: AC68U using ports 3 & 4
- Firmware: Asuswrt-Merlin 376.47 with JFFS enabed
- Switch: Netgear GSM7224R (including other 802.3ad capable switches)
- User Scripts (in /jffs/scripts/): firewall-start and services-start

Inspiration & Credits

- LinkAgg script by @KAD - http://forums.smallnetbuilder.com/showthread.php?t=12735
- DD-WRT forum post by @mrengles - http://www.dd-wrt.com/phpBB2/viewtopic.php?p=869756

Description

After several attempts (and many failures) to get link aggregation working using the LinkAgg script, I decided to further investigate the underlining cause for the failures and concluded:

1. LinkAgg, which has bugs, was designed to work with the 66u model which uses different internal switch port mappings (this was mentioned in several posts)
2. For some reason, Vlan 3 does not appear to work properly in the 68u model. This meant that I needed to use vlan 4 and vlan 5 instead.
3. The use of the xmit_hash_policy option and the corresponding switch/NAS hashing option was needed in order for link aggregation to work with a variety of switches & NAS boxes *new edit.
4. A simpler method was required to get link aggregation working across reboots and firmware updates.

Enough said - let's get to it ;)

Step 1 - NVRAM Edits | Note: You will need to repeat this step if you clear the nvram ie. Beta to Final versions, resetting to Factory default

Apply the following changes to the router's nvram:

Code:
nvram set vlan4ports="3 5t"
nvram set vlan5ports="4 5t"
nvram set vlan4hwname=et0
nvram set vlan5hwname=et0
nvram commit

Step 2 - Create/Edit services-start script

Include the following code in services-start script located in /jffs/scripts/ (you will need to create this file from scratch, if you haven't done so already, with the right permissions)

Code:
#!/bin/sh

# Logger Services
logger -t "($(basename $0))" $$ SERVICES-START being started....

logger -t "($(basename $0))" $$ Bonding ports 3 and 4 commencing....
# Pre-Bonding
robocfg vlan 1 ports "1 2 5*"

# Bonding
sleep 2s
modprobe bonding
# Setting mode to 802.3ad
echo 802.3ad > /sys/class/net/bond0/bonding/mode
# Setting LACP rate to fast
echo fast > /sys/class/net/bond0/bonding/lacp_rate
# Setting MII monitoring interval to 50
echo 50 > /sys/class/net/bond0/bonding/miimon
# Setting xmit hash policy to layer3+4
echo 1 > /sys/class/net/bond0/bonding/xmit_hash_policy
ip link set bond0 up
echo +vlan4 > /sys/class/net/bond0/bonding/slaves
echo +vlan5 > /sys/class/net/bond0/bonding/slaves
brctl addif br0 bond0

# Post-Bonding
sleep 2s
logger -t "($(basename $0))" $$ Bonding Status....
cat /proc/net/bonding/bond0 | sed 's/^/+++  /' | logger


Step 3 - Create/Edit firewall-start script

Include the following code in firewall-start script located in /jffs/scripts/ (you will need to create this file from scratch, if you haven't done so already, with the right permissions)

Code:
#!/bin/sh

# Bonding IPtables rules
iptables -I INPUT -i vlan4 -j ACCEPT
iptables -I INPUT -i vlan5 -j ACCEPT
iptables -I INPUT -i bond0 -j ACCEPT

# Firewall/IPtables Performance Tweak for Bond0 to be placed right after the above bonding rules and before your custom rules - if any.
iptables -D INPUT `iptables --line-numbers -nL INPUT | grep ESTABLISHED | tail -n1 | awk '{print $1}'`
iptables -I INPUT -m state --state RELATED,ESTABLISHED -j ACCEPT

Step 4 - Set the switch's LAG hashing mode

This is the LAG config for the 2 switch ports you have connected to the router's port 3 and 4.

- Set the hashing mode to "Source/Destination MAC, VLAN, EtherType, source MODID/port" or the equivalent mode in your switch.

Step 5 - Reboot

You should now have link aggregation working with your 68u router and 802.3ad capable switch :)

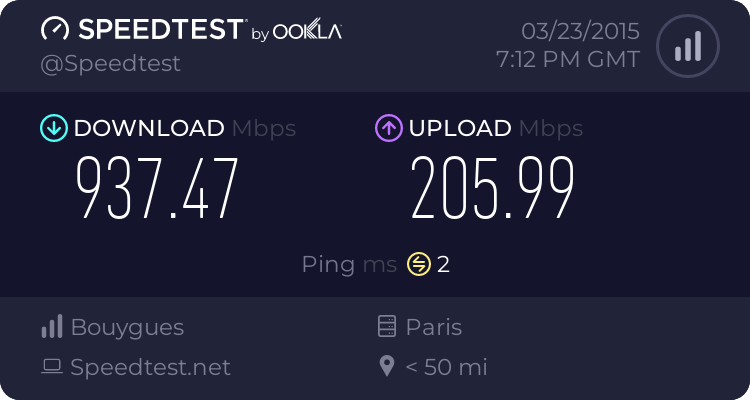
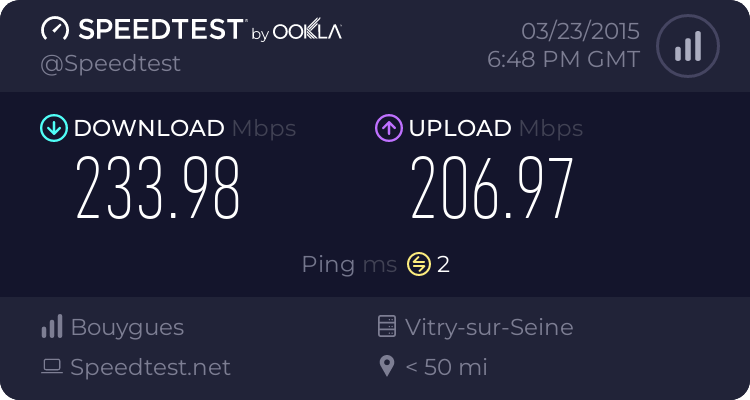
I have successfully tried this on my RT-AC68U, however it seems like this disables CTF, I went from about 940Mbps (I have a gigabit internet connection at home) WAN to LAN performances to around 230Mbps, the WAN to LAN routing performances were too low for me so I had to undo the changes.

Before:
4235911648.png


After:
4235856605.png
 
I have successfully tried this on my RT-AC68U, however it seems like this disables CTF

Are you sure you didn't enable iptraffic monitoring or some other service that is known to automatically disable CTF? I have CTF enabled and I'm maxing out my 50Mbps connection.. Wish I had your wan speed to test ;)

2015-03-23_23-18-23.png
 

Similar threads

Latest threads

Sign Up For SNBForums Daily Digest

Get an update of what's new every day delivered to your mailbox. Sign up here!
Top