What's new

Intel SS4200-E Lives Again

  • SNBForums Code of Conduct

    SNBForums is a community for everyone, no matter what their level of experience.

    Please be tolerant and patient of others, especially newcomers. We are all here to share and learn!

    The rules are simple: Be patient, be nice, be helpful or be gone!

Samir

Very Senior Member
I finally got a NAS that's new to me--the Intel ss4200-e.

So now that this unit is well over a decade old, I'm wondering about some things about the unit:
  • did anyone ever figure out if 2gb memory did anything more than the 1gb memory?
  • Did upgrading the cpu to a Celeron 450 (or something higher) really improve performance?
  • Has anyone tried drives larger than 4tb in it?
  • Have newer/faster drives or SSDs improved the transfer speeds (since we now have drives much faster than back in the day).
I've been doing a lot of reading on here as well as other places to gather the answers to these questions, but I haven't found too many definitive answers. :(

Any leads, thoughts, or experiences welcome. :)
 
SS4200-e

Product Brief - https://www.intel.com/Assets/PDF/general/318482.pdf

CPU is a gimped version of the Core2 architecture, LGA775, so might be able to bump it to a dual Core (Conroe platform).

FreeNAS (and as such, FreeBSD, and perhaps pfSense) - I would assume that debian could be installed, and then build an OpenMediaVault on it.

http://gopalthorve.com/install-freenas-intel-ss4200-nas/

Console Port info

http://ss4200.pbworks.com/w/page/5122741/Console Access via RS232

More here...

http://www.mswhs.com/2007/10/more-info-intel-entry-storage-system-ss4200-e/

Looks like single DDR2 DIMM, so might be able to bump it up to 2 gig - chipset will have issues with 4 gig dimm (won't be able to access all memory if I recall)
 
Yep, got that pdf saved. :D

I've got a lot of spare lga775 cpus, but from what I've read performance never really improved for most people that upgraded. There is a Celeron 450 that's still 35w and is much faster on single thread performance, but I've only seen spot on line where someone did the upgrade. They did see faster speeds, but I'm not sure if that was with the nas in stock form (which is how I intend to use it).
https://www.cpubenchmark.net/compare/Intel-Celeron-420-vs-Intel-Celeron-450/650vs653

Yep, LOTS of people have converted this to another NAS platform--I just want to use it as is and upgrade it a tad if possible.

I got the SSH to work, so don't need the console for now. :)

The unit I have was upgraded in ram, and the 'free' command shows 1gb total. I have read that the stock software will only use 1gb of ram, and that a 4gb module is not supported. But I know that could be because of the type of chips used in the module and incompatibility with the chipset.

The unit is still very good even today. With the very simple program lan_speedtest, I saw 30+ write and 45+ reads under xp, and 85+ read and write with server 2008 r2 (essentially win7 64-bit). This speed is sustained up to file sizes of 256MB, which then drops. This with the 4 1tb wd green drives in a single raid5 volume.

This is where my curiosity is piqued as modern drives have almost double the sustained transfer speeds of the wd green, and that would mean that this old little nas could possibly exceed gigabit transfer speeds with modern drives installed as well as hit some serious capacities if it can use 4x of the larger 8tb or 16tb drives. :eek:
 
So something corrupted the volume I had created for testing on the 4x 1tb wd green drives, and I suspect one of the drives may be starting to have issues, so I replaced them with some brand new 2tb hgst enterprise class drives. The new 2tb drives have a much higher sustained transfer rate than the wd 1tb (180+ vs 111), so this would be an interesting test scenario to see if the unit's performance will increase with faster drives.

And I just completed some of the same testing using lan_speedtest and it seems like performance is the same, which indicates that maybe that celeron does need an upgrade to really hit higher speeds. My use case for this will be where speed isn't important so I probably won't upgrade the cpu, but I will note this here so I will remember what I did/didn't do a few years later. :D

I think the issues with the potentially bad 1tb drive also might have affected my earlier test results as the drop in speeds was less than 10MB/s in the varying file size test loads. Otherwise, maybe the faster transfer speeds of these 2tb drives makes the performance more consistent with different loads, or that the drives are just simply better at handling the iops. Who knows.
 
I'm currently testing the entire 5gb+ volume using h2testw and settled on a sustained read and write just shy of 50Mb/s with Server 2008 r2, reading at 47.7mb/s as I type. Temperatures have increased by about 10F in the enclosure after adding the newer 2TB drives and putting them under load, but still stay at around 70F for the cpu and 118F for the board as per the system health dashboard. This is only 19C/47C so very cool and still dead silent. :)
 
So some new information on this unit that no one in the last 10 years even seemed to try--a second NIC.

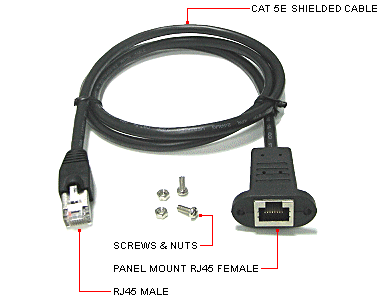
Apparently according to what looks like an Intel sales presentation, there was supposed to be an optional 2nd nic. This opens up the door to exactly what I needed (dual nic for access from two different lans), but I don't think anyone has ever tried it. There's a cutout for the 2nd ethernet on my box, and it seems that a pcie x1 extender and a low profile nic might work. To create the port on my box, I'm looking at using a panel mount ethernet coupler so I can just plug it into the nic and then put a factory looking port on the box.
 
And when thinking about the 2nd nic some more, I bet a usb nic will work, saving me a lot of the work for an integrated nic.
 
Okay, LOTS of updates on this. I want to add this information to the ss4200 wiki found here, but I don't have access:
http://ss4200.pbworks.com/w/page/5122751/FrontPage

So instead I will put it all in this thread.

I purchased what used to be the Legend Micro version of the ss4200-e, which was a converted from a Fujitsu branded ss4200-ewh using an ide dom and the emc software. This unit works identically to my Intel ss4200-e, except that there are no references to Intel, just Emc. The firmware revision is the exact same and both work in the same manner. I'm using the Fujitsu box for these tests and using the Intel one for reference.

First, some base information that helped me get started. Enabling ssh and using putty to login into the linux system at the heart of the unit helps tremendously to poke around in the system and figure out what it is doing on a granular level.

To enable ssh access, there is a hidden 'support' page at:
http://NAS-IP/support.html

You can enable it there. Once you have enabled it, you can log into the system using putty with the login/password of root/sohoADMIN_PASSWORD. If there is no admin password (like on my Fujitsu), you can simply use soho for the password. This is a very high level access and you can break your box permanently as well as lose your data if you mess things up so tread lightly!

Tried a usb nic using a asix ax88772B based nic and confirmed it didn't work because the drivers weren't loaded. The 'lsusb' command shows all the attached usb devices and 'ifconfig -a' will show all the interfaces. I also checked 'ifmod' to see if there was any additional modules loaded and there didn't seem like there was, so I gave up at this point. Someone more knowledgeable than me in unix could probably quickly figure out how to add the driver and get the usb nic working. (Please post if you know how as I might try it.)

So with no driver for another nic, I started researching what the driver is that supports the native nic and what other nics that driver supports. The idea being to add a second nic to the x1 pcie slot.

I saw 'e100' and 'e1000' as loaded modules via the 'lsmod' command. These are driver packages for Intel cards, and work for at least the following nics according to the docs I found at https://downloadmirror.intel.com/5154/ENG/e100.htm and https://downloadmirror.intel.com/20927/eng/e1000.htm:

Code:
82558 PRO/100+ PCI Adapter 668081-xxx, 689661-xxx
82558 PRO/100+ Management Adapter 691334-xxx, 701738-xxx, 721383-xxx
82558 PRO/100+ Dual Port Server Adapter 714303-xxx, 711269-xxx, A28276-xxx
82558 PRO/100+ PCI Server Adapter 710550-xxx
82550
82559

PRO/100 S Server Adapter 752438-xxx (82550)
A56831-xxx, A10563-xxx, A12171-xxx, A12321-xxx, A12320-xxx, A12170-xxx
748568-xxx, 748565-xxx (82559)
82550
82559

PRO/100 S Desktop Adapter 751767-xxx (82550)
748592-xxx, A12167-xxx, A12318-xxx, A12317-xxx, A12165-xxx
748569-xxx (82559)
82559 PRO/100+ Server Adapter 729757-xxx
82559 PRO/100 S Management Adapter 748566-xxx, 748564-xxx
82550 PRO/100 S Dual Port Server Adapter A56831-xxx
82551 PRO/100 M Desktop Adapter A80897-xxx
  PRO/100 S Advanced Management Adapter 747842-xxx, 745171-xxx
CNR PRO/100 VE Desktop Adapter A10386-xxx, A10725-xxx, A23801-xxx, A19716-xxx
  PRO/100 VM Desktop Adapter A14323-xxx, A19725-xxx, A23801-xxx, A22220-xxx, A23796-xx
Code:
Intel® PRO/1000 PT Server Adapter
Intel® PRO/1000 PT Desktop Adapter
Intel® PRO/1000 PT Network Connection
Intel® PRO/1000 PT Dual Port Server Adapter
Intel® PRO/1000 PT Dual Port Network Connection
Intel® PRO/1000 PF Server Adapter
Intel® PRO/1000 PF Network Connection
Intel® PRO/1000 PF Dual Port Server Adapter
Intel® PRO/1000 PB Server Connection
Intel® PRO/1000 PL Network Connection
Intel® PRO/1000 EB Network Connection with I/O Acceleration
Intel® PRO/1000 EB Backplane Connection with I/O Acceleration
Intel® PRO/1000 PT Quad Port Server Adapter
Intel® PRO/1000 PF Quad Port Server Adapter
Intel® 82566DM-2 Gigabit Network Connection
Intel® Gigabit PT Quad Port Server ExpressModule

Intel® PRO/1000 Gigabit Server Adapter
Intel® PRO/1000 PM Network Connection
Intel® 82562V 10/100 Network Connection
Intel® 82566DM Gigabit Network Connection
Intel® 82566DC Gigabit Network Connection
Intel® 82566MM Gigabit Network Connection
Intel® 82566MC Gigabit Network Connection
Intel® 82562GT 10/100 Network Connection
Intel® 82562G 10/100 Network Connection
Intel® 82566DC-2 Gigabit Network Connection
Intel® 82562V-2 10/100 Network Connection
Intel® 82562G-2 10/100 Network Connection
Intel® 82562GT-2 10/100 Network Connection

Intel® 82578DM Gigabit Network Connection
Intel® 82577LM Gigabit Network Connection

Intel® PRO/1000 Gigabit Server Adapter
Intel® PRO/1000 PM Network Connection
Intel® 82562V 10/100 Network Connection
Intel® 82566DM Gigabit Network Connection
Intel® 82566DC Gigabit Network Connection
Intel® 82566MM Gigabit Network Connection
Intel® 82566MC Gigabit Network Connection
Intel® 82562GT 10/100 Network Connection
Intel® 82562G 10/100 Network Connection
Intel® 82566DC-2 Gigabit Network Connection
Intel® 82562V-2 10/100 Network Connection
Intel® 82562G-2 10/100 Network Connection
Intel® 82562GT-2 10/100 Network Connection
Intel® 82578DC Gigabit Network Connection
Intel® 82577LC Gigabit Network Connection
Intel® 82567V-3 Gigabit Network Connection

I have a Dell 0u3867 Intel Pro/1000 PT pcie server adapter, which matched a supported nic on the list so that was the testbed. The idea being that if this card is installed in the system, it should recognize it, and depending on the extent of the software accommodating 2 nics, it might 'just work' after installation.

To run this test, the system cover had to be off and drives 3 and 4 could not be installed. (I had set up a 1tb mirrored configuration using drives in 1 and 2 just for this scenario.) The drive cages for 3 and 4 need to be flipped over onto 1 and 2 for there to be enough vertical room for the nic. It will not be able to run permanently this way and will require a pcie x1 relocation cable in order to mount the nic elsewhere. Also, the retaining bracket for the nic needed to be removed. Because of the tight test fit, I also needed to plug in the ethernet cable into the nic before installing the nic in the x1 slot, else I would not be able to plug in the cable. I had to remind myself to make sure the system was completely unplugged while doing this.

The second nic's lights came alive shortly after the first, so I knew it was at least powered. Once the system booted successfully (like normal), I checked 'ifconfig -a' to see an eth1 was now on the list, but that it was not listed as an active interface. I can't remember exactly which ifconfig commands I ran now (it was late), but I was able to bring the interface up and assign it a static ip. Using this static ip, I could now ping the box on both the native nic as well as my second nic.

After logging into the web interface on both nics on different browsers, I noticed the cpu temperature nearing 100F. Comparing it to my other ss4200 that was at 60F, it was obvious that leaving the cover open was not allowing proper airflow. I turned on a ceiling fan in the room where the test unit was and temps came down about 10F. The rear fans did not speed up at all even though temps elevated. This is why I hate pwm fan designs, but in this system it normally does a great job of keeping quiet while adequately cooling, which will be important for the environment this will finally be deployed in several thousand miles away at the end of a ipsec vpn tunnel as a near-time off-site backup.

With both interfaces working, I proceeded to examine if the second interface helps performance. In a nutshell, it doesn't as I was able to get the same performance from hammering the native nic with multiple sessions as I did from splitting the tests between both nics. I believe the limits on speed are possibly the cpu (although I never saw this above 30% on the 'top' command), memory (which can be upgraded to 1gb, but is limited by the software to that maximum), and drive speed. It would be interesting to see what modern day ssds that can transfer in excess of 500Mb/s would do in this unit, but alas I have no such drives to do such testing.
 
So while a second nic can be installed, it does not automatically start and does require some re-engineering to get it to fit. These two challenges are addressed next.

I haven't completely figured out how to fit the card yet because I don't know if I will be adding a second nic versus some routing to get the results I want (2 separate networks having access to the nas), but a pcie x1 extender cable should allow the card to be mounted upside down under the cage for drive 3. There isn't much room for a mounting apparatus, but there is about 1/8" to 1/4" for tape or adhesive pads to hold the card to the bottom of drive cage 3. This clears the chipset heatsink, and all other metal in the case by 1/8" and also is very close to the rear fan, which is important since the pro/1000 pt does have a heatsink on the main chip. This setup also leaves enough room for the following to be added so that a second ethernet port can be added to the original 'optional nic' factory location next to the esata ports:
p115p2.gif

(http://www.frontx.com/pro/p115.html)

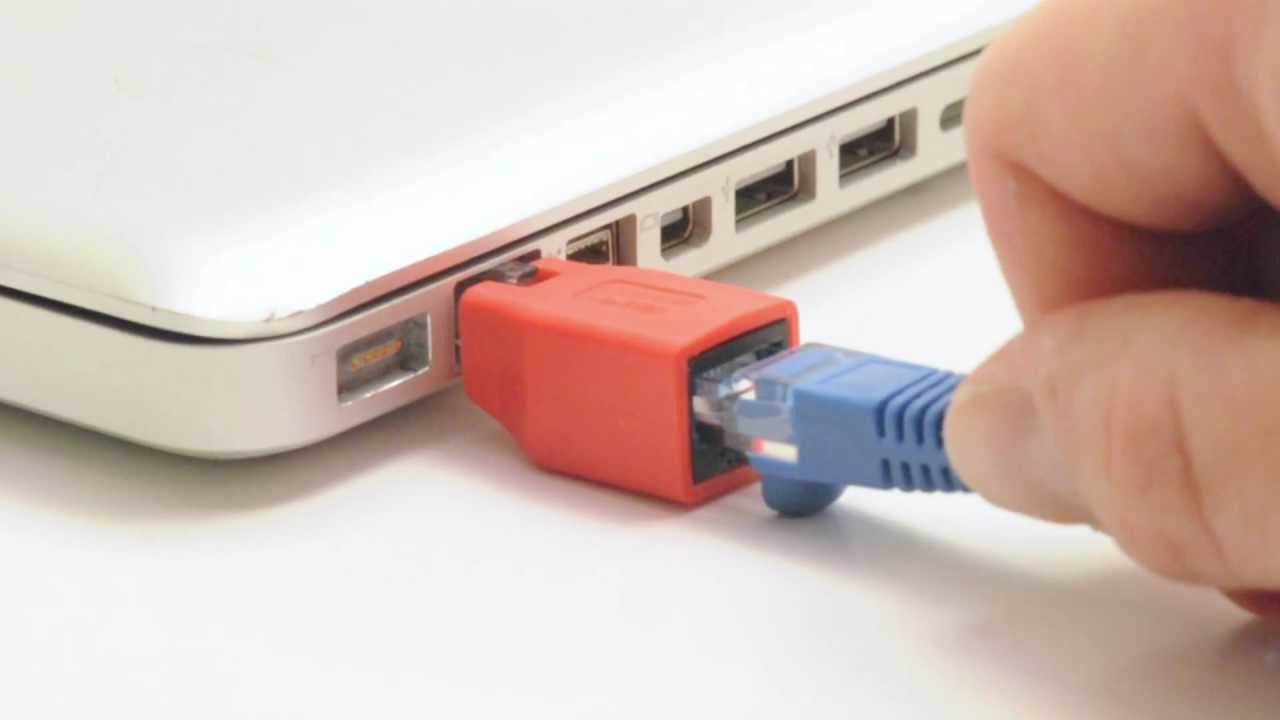
Since there probably isn't enough room to mount that port to the case and clear some of the ic on the motherboard, I was going to simply use a crossover adapter like this to keep it locked into place:
maxresdefault.jpg


This would also allow the entire modification to be reversed completely without any effects except the cutout on the case being left open.

So that takes care of the tricky part of mounting it, but what about it auto-starting? Well, that's the part I'm still working on since I don't know unix. I was a real DOS hound back in the days so it is a bit exciting to learn about the analogus processes in unix. From what I've gathered so far, it looks like '/etc/network/interfaces' is what controls the nics coming up and grabbing dhcp ip addresses. To view the file, you use the 'cat' command, so 'cat /etc/network/interfaces' works like the DOS 'type' command and should look like the following:
Code:
auto lo
iface lo inet loopback
auto eth0
iface eth0 inet dhcp
I suspect that if I modified this file to look like this:
Code:
auto lo
iface lo inet loopback
auto eth0
iface eth0 inet dhcp
auto eth1
iface eth1 inet dhcp
that the second interface would simply turn on and work at startup. I was hoping that I could run the commands on the command line, but it doesn't find 'iface' and 'auto' when I tried it accidentally a few seconds ago. What I will try doing is to rename the current interfaces file and then copy a new new and see if I can modify the new one and it work. Otherwise I can delete it and just rename the original one back. Now, this may not work at all because there is also a file called 'interfaces_orig' that judging by the time stamps looks like it is always copied to 'interfaces' at startup. I can't confim this yet.

While snooping around in /etc/network/ I also saw a file called 'bond-init'. I believe this is part of the code that was put already into place for the optional factory second nic. Its contents are the following:
Code:
list_eths()
{
        ifconfig -a | awk '/^eth[0-9]/ { print $1 }'
}

for card in `list_eths`
do
        cards="$cards $card"
done

ifconfig bond0 up
ifenslave bond0 $cards

Reading about some of these commands, it looks like this is a script to look for all the nics in the system and then bond them together in some way. 'ifconfig -a' shows an interface called 'bond0' that is not up, so I think there was some effort to aggregate the nics by the system designers. As they used to say in the old Tootsie Roll Pops commercials, 'the world may never know'.

Since no one has attempted to use >4TB drives on these, I did some research on the chipset that contains the sata controller. It does not seem like there is any limit on the size of the drives supported and since most 4TB drives were already advanced format (4Kn) by the time they were installed in this unit, I expect that any modern day larger drives will work just fine. This really makes this unit appealing for a large 20-40TB bulk storage nas on the cheap. I don't know how it compares to the freenas/nas4free/etc options out there, but this one is quite simple to set up.
 
Last edited:
I did notice in my speed testing that there was some stuttering in the write speeds. Apparently certain drives NCQ (native command queuing) doesn't work well with either the software or hardware. This is noted on the ss4200 wiki and has a fix but doesn't go into details (http://ss4200.pbworks.com/w/page/5122755/Performance Note - Disabling Drive Command Queuing):
We were finding that using these NAS units showed some poor disk speed performance when we were running backups to the unit. After some work on the unit, one of the guys (with a ton more linux knowledge than myself) found that disabling the command queuing helped. His notes below:


If performance drops on the drive, and you ssh in and run "dmesg l more" and look for the following errors:

ata1.00: spurious completions during NCQ
ata1: soft resetting port
ata1.00: configured for UDMA/XXX

exception Emask 0x10 SAct 0x7 SErr 0x400100 action 0x2 frozen


To fix, do the following from an SSH session:

Run "vi /etc/init.d/S99commandqueue"
Insert the following into the file (type "i" to get into insert mode):
#!/bin/sh

echo 2 > /sys/block/sda/device/queue_depth

echo 2 > /sys/block/sdb/device/queue_depth

echo 2 > /sys/block/sdc/device/queue_depth

echo 2 > /sys/block/sdd/device/queue_depth

Save and quit (press "Esc" then ":wq")
Run "chmod 755 /etc/init.d/S99commandqueue"
Reboot the NAS
Well, I dug deeper and found out more information about this. It seems that HGST drives (which is what I have installed in my Intel unit) have a problem with NCQ. So they will throw this error and show up via the 'dmesg' command. Running 'cat /sys/block/sdX/device/queue_depth' (where X is the drive a, b, c, d) returns the number '31'. Apparently the fix is to reduce this depth to just 2.

Running 'ls -ls /sys/block/sdX/device/' gives you a list of many files that have information about the drive. 'cat /sys/block/sdX/device/model' will give you the exact model number of the drive. 'cat /sys/block/sdX/device/timeout' seems like the timeout for errors, set to 30 on my Intel unit. 'cat /sys/block/sdX/device/queue_type' is set to 'simple', which may even explain why there is an issue if the drives don't use a 'simple' queue type. 'cat /sys/block/sdX/device/rev' looks to be the firmware revision, but I can't tell for sure. 'cat /sys/block/sdX/device/ioerr_cnt' will show error counts in what looks like hexidecimal, and there is one for 'iodone_cnt' and more. In fact, I'm just going to paste the ls -ls that I see:
Code:
   0 lrwxrwxrwx    1 root     root            0 Jun 30 08:12 block:sda -> ../../../../../../block/sda
   0 lrwxrwxrwx    1 root     root            0 Jun 30 08:12 bus -> ../../../../../../bus/scsi
   0 --w-------    1 root     root         4096 Jun 30 08:12 delete
   0 -r--r--r--    1 root     root         4096 Jun 30 08:12 device_blocked
   0 lrwxrwxrwx    1 root     root            0 Jun 30 08:12 driver -> ../../../../../../bus/scsi/drivers/sd
   0 -r--r--r--    1 root     root         4096 Jun 30 08:12 iocounterbits
   0 -r--r--r--    1 root     root         4096 Jun 30 08:12 iodone_cnt
   0 -r--r--r--    1 root     root         4096 Jun 30 08:12 ioerr_cnt
   0 -r--r--r--    1 root     root         4096 Jun 30 08:12 iorequest_cnt
   0 -r--r--r--    1 root     root         4096 Jun 30 08:12 model
   0 drwxr-xr-x    2 root     root            0 Jun 19 00:01 power
   0 -rw-r--r--    1 root     root         4096 Jun 30 08:11 queue_depth
   0 -r--r--r--    1 root     root         4096 Jun 30 08:12 queue_type
   0 --w-------    1 root     root         4096 Jun 30 08:12 rescan
   0 -r--r--r--    1 root     root         4096 Jun 30 08:12 rev
   0 lrwxrwxrwx    1 root     root            0 Jun 30 08:12 scsi_device:0:0:0:0 -> ../../../../../../class/scsi_device/0:0:0:0
   0 lrwxrwxrwx    1 root     root            0 Jun 30 08:12 scsi_disk:0:0:0:0 -> ../../../../../../class/scsi_disk/0:0:0:0
   0 -r--r--r--    1 root     root         4096 Jun 30 08:12 scsi_level
   0 -rw-r--r--    1 root     root         4096 Jun 30 08:12 state
   0 lrwxrwxrwx    1 root     root            0 Jun 30 08:12 subsystem -> ../../../../../../bus/scsi
   0 -rw-r--r--    1 root     root         4096 Jun 30 08:12 timeout
   0 -r--r--r--    1 root     root         4096 Jun 30 08:12 type
   0 --w-------    1 root     root         4096 Jun 30 08:12 uevent
   0 -r--r--r--    1 root     root         4096 Jun 30 08:12 vendor

So after looking again at the fix for the NCQ issue, I wondered what '/etc/init.d/S99commandqueue' was and did a 'cat /etc/init.d/' to find what looks like the file that should detect multiple nic instances--'S39interfaces'. 'cat /etc/init.d/S39interfaces' is the following:q
Code:
#!/bin/sh
#
#       find all attached NIC(s) and append to /etc/network/interfaces at first boot
#
##########################################

IF_FILE=/etc/network/interfaces
ORIG_IF_FILE=/etc/network/interfaces_orig
TMP_FILE=/tmp/tmp_interfaces

if [ ! -f $ORIG_IF_FILE ]
then
        echo "auto lo" >> $TMP_FILE
        echo "iface lo inet loopback" >> $TMP_FILE

        for i in `ifconfig -a | grep eth | awk '{print $1}'`
        do
                echo "auto $i" >> $TMP_FILE
                echo "iface $i inet dhcp" >> $TMP_FILE
        done

        mv -f $IF_FILE $ORIG_IF_FILE
        mv -f $TMP_FILE $IF_FILE
fi
which looks like a boot script to get all the nics into the 'interfaces' startup file. But because it looks like this is only run if the interfaces file doesn't already exist, it doesn't seem like it picks up the new nic I installed. I will have to see if moving the existing interfaces files changes anything, which it may.

Found this via 'dmesg' where the Intel driver versions are as well as the recognition of the second card and it's hardware configuration:
Code:
e100: Intel(R) PRO/100 Network Driver, 3.5.17-k2-NAPI
e100: Copyright(c) 1999-2006 Intel Corporation
Intel(R) PRO/1000 Network Driver - version 7.2.9-k4
Copyright (c) 1999-2006 Intel Corporation.
ACPI: PCI Interrupt 0000:01:00.0[A] -> Link [LNKA] -> GSI 10 (level, low) -> IRQ 10
PCI: Setting latency timer of device 0000:01:00.0 to 64
e1000: 0000:01:00.0: e1000_probe: (PCI Express:2.5Gb/s:32-bit) 00:15:17:32:01:b1
e1000: eth0: e1000_probe: Intel(R) PRO/1000 Network Connection
ACPI: PCI Interrupt 0000:02:00.0[A] -> Link [LNKB] -> GSI 11 (level, low) -> IRQ 11
PCI: Setting latency timer of device 0000:02:00.0 to 64
e1000: 0000:02:00.0: e1000_probe: (PCI Express:2.5Gb/s:32-bit) 00:15:17:78:4e:8e
e1000: eth1: e1000_probe: Intel(R) PRO/1000 Network Connection

My Fujitsu came with only 512MB of RAM and the Intel has 2GB. The 'free' command between both machines shows that when given 1GB of ram, the unit will use it, but anything beyond that is a waste as it isn't used.

It's terrible that I may be re-doing a lot of work that was already done on this machine and lost when the site/forum where A LOT of people discussed and worked on this unit disappeared. That's the problem with our digital world--history can disappear like it never existed. :(

That's it for now.
 
Well, no dice on editing the '/etc/network/interfaces' file. 'eth1' still doesn't get a dhcp ip on its own. I have to ssh in and run the 'ifconfig eth1 IP_ADDRESS' command, where IP_ADDRESS is the address I want to assign it. This is currently just another ip on the same lan as the primary nic so it seems to pick up the netmask and broadcast from there. As soon as the ip is assigned, the interfaces comes up and is usable. Reference from where I learned ifconfig:
https://www.computerhope.com/unix/uifconfi.htm

You can tell on the motherboard where another nic chip was to be soldered directly onto the motherboard to provide this second nic. I don't think it was supposed to come from the pcie x1 slot at all like how I've got it setup and working.

For what I wanted to do--have a set and forget nas--having to log in to enable the second nic won't work, so I won't be pursuing it any longer. I will figure out how to have my 2 different lan segments access it via routing instead.
 
And after looking at how much time figuring out the routing will take, I'm not going that route either and am just going to use another method to make the backup work.
 
Quite neat learning about it. I think it's a pretty neat machine.

The one thing I like about it is that it uses standard parts so if something breaks, it's pretty easy to recover the data and/or getting it back running.
 
So I'm back in this thread to reference some of what I had wrote earlier as well as to add some moreknowledge. I'm trying the following 6TB drives (as per what cat /sys/block/sdX/device/model says) :
Code:
HGST HUS726T6TAL
HGST HUS726060AL
But they do not show up recognized in the web interface. In putty, the dmesg command

seems to indicate that something is wrong:
Code:
sda : very big device. try to use READ CAPACITY(16).
sda : unsupported sector size -189857792.
SCSI device sda: 0 512-byte hdwr sectors (0 MB)
sda: Write Protect is off
sda: Mode Sense: 00 3a 00 00
SCSI device sda: drive cache: write back
sd 0:0:0:0: Attached scsi disk sda
sdb : very big device. try to use READ CAPACITY(16).
sdb : unsupported sector size -189857792.
SCSI device sdb: 0 512-byte hdwr sectors (0 MB)
sdb: Write Protect is off
sdb: Mode Sense: 00 3a 00 00
It seems that even though the drives are formatted 512e sectors, theirsector size is not being recognized properly.

The command
Code:
hdparm
exists so I'm able to run the following:
Code:
hdparm -I /dev/sdX[code] with the following results:[code]# hdparm -I /dev/sda

/dev/sda:

ATA device, with non-removable media
        Model Number:       HGST HUS726T6TALE6L4
        Serial Number:      V8GK658R
        Firmware Revision:  VKGNW40H
Transport: Serial, ATA8-AST, SATA 1.0a, SATA II Extensions, SATA Rev 2.5; Revision: ATA8-AST T13 Project D1697

Revision 0b
Standards:
        Supported: 9 8 7 6 5
        Likely used: 9
Configuration:
        Logical         max     current
        cylinders       16383   16383
        heads           16      16
        sectors/track   63      63
        --
        CHS current addressable sectors:   16514064
        LBA    user addressable sectors:  268435455
        LBA48  user addressable sectors:11721045168
        device size with M = 1024*1024:     5723166 MBytes
        device size with M = 1000*1000:     6001175 MBytes (6001 GB)
Capabilities:
        LBA, IORDY(can be disabled)
        Queue depth: 32
        Standby timer values: spec'd by Standard, no device specific minimum
        R/W multiple sector transfer: Max = 16  Current = 16
        Advanced power management level: unknown setting (0x00fe)
        DMA: mdma0 mdma1 mdma2 udma0 udma1 udma2 udma3 udma4 udma5 *udma6
             Cycle time: min=120ns recommended=120ns
        PIO: pio0 pio1 pio2 pio3 pio4
             Cycle time: no flow control=120ns  IORDY flow control=120ns
Commands/features:
        Enabled Supported:
           *    SMART feature set
                Security Mode feature set
           *    Power Management feature set
           *    Write cache
           *    Look-ahead
           *    Host Protected Area feature set
           *    WRITE_BUFFER command
           *    READ_BUFFER command
           *    NOP cmd
           *    DOWNLOAD_MICROCODE
                Advanced Power Management feature set
                Power-Up In Standby feature set
           *    SET_FEATURES required to spinup after power up
                SET_MAX security extension
           *    48-bit Address feature set
           *    Device Configuration Overlay feature set
           *    Mandatory FLUSH_CACHE
           *    FLUSH_CACHE_EXT
           *    SMART error logging
           *    SMART self-test
           *    Media Card Pass-Through
           *    General Purpose Logging feature set
           *    WRITE_{DMA|MULTIPLE}_FUA_EXT
           *    64-bit World wide name
           *    URG for READ_STREAM[_DMA]_EXT
           *    URG for WRITE_STREAM[_DMA]_EXT
           *    WRITE_UNCORRECTABLE command
           *    {READ,WRITE}_DMA_EXT_GPL commands
           *    Segmented DOWNLOAD_MICROCODE
                unknown 119[6]
           *    unknown 119[7]
           *    SATA-I signaling speed (1.5Gb/s)
           *    SATA-II signaling speed (3.0Gb/s)
           *    unknown 76[3]
           *    Native Command Queueing (NCQ)
           *    Host-initiated interface power management
           *    Phy event counters
           *    unknown 76[12]
           *    unknown 76[15]
                Non-Zero buffer offsets in DMA Setup FIS
                DMA Setup Auto-Activate optimization
                Device-initiated interface power management
                In-order data delivery
           *    Software settings preservation
                unknown 78[7]
                unknown 78[10]
                unknown 78[11]
           *    SMART Command Transport (SCT) feature set
           *    SCT LBA Segment Access (AC2)
           *    SCT Error Recovery Control (AC3)
           *    SCT Features Control (AC4)
           *    SCT Data Tables (AC5)
Security:
        Master password revision code = 65534
                supported
        not     enabled
        not     locked
                frozen
        not     expired: security count
        not     supported: enhanced erase
        126min for SECURITY ERASE UNIT.
Checksum: correct

# hdparm -I /dev/sdb

/dev/sdb:

ATA device, with non-removable media
        Model Number:       HGST HUS726060ALE610
        Serial Number:      K8K22XMN
        Firmware Revision:  APGNTD05
Transport: Serial, ATA8-AST, SATA 1.0a, SATA II Extensions, SATA Rev 2.5; Revision: ATA8-AST T13 Project D1697

Revision 0b
Standards:
        Supported: 9 8 7 6 5
        Likely used: 9
Configuration:
        Logical         max     current
        cylinders       16383   16383
        heads           16      16
        sectors/track   63      63
        --
        CHS current addressable sectors:   16514064
        LBA    user addressable sectors:  268435455
        LBA48  user addressable sectors:11721045168
        device size with M = 1024*1024:     5723166 MBytes
        device size with M = 1000*1000:     6001175 MBytes (6001 GB)
Capabilities:
        LBA, IORDY(can be disabled)
        Queue depth: 32
        Standby timer values: spec'd by Standard, no device specific minimum
        R/W multiple sector transfer: Max = 16  Current = 16
        Advanced power management level: unknown setting (0x00fe)
        DMA: mdma0 mdma1 mdma2 udma0 udma1 udma2 udma3 udma4 udma5 *udma6
             Cycle time: min=120ns recommended=120ns
        PIO: pio0 pio1 pio2 pio3 pio4
             Cycle time: no flow control=120ns  IORDY flow control=120ns
Commands/features:
        Enabled Supported:
           *    SMART feature set
                Security Mode feature set
           *    Power Management feature set
           *    Write cache
           *    Look-ahead
           *    Host Protected Area feature set
           *    WRITE_BUFFER command
           *    READ_BUFFER command
           *    NOP cmd
           *    DOWNLOAD_MICROCODE
                Advanced Power Management feature set
                Power-Up In Standby feature set
           *    SET_FEATURES required to spinup after power up
                SET_MAX security extension
           *    48-bit Address feature set
           *    Device Configuration Overlay feature set
           *    Mandatory FLUSH_CACHE
           *    FLUSH_CACHE_EXT
           *    SMART error logging
           *    SMART self-test
           *    Media Card Pass-Through
           *    General Purpose Logging feature set
           *    WRITE_{DMA|MULTIPLE}_FUA_EXT
           *    64-bit World wide name
           *    URG for READ_STREAM[_DMA]_EXT
           *    URG for WRITE_STREAM[_DMA]_EXT
           *    WRITE_UNCORRECTABLE command
           *    {READ,WRITE}_DMA_EXT_GPL commands
           *    Segmented DOWNLOAD_MICROCODE
                unknown 119[6]
           *    unknown 119[7]
           *    SATA-I signaling speed (1.5Gb/s)
           *    SATA-II signaling speed (3.0Gb/s)
           *    unknown 76[3]
           *    Native Command Queueing (NCQ)
           *    Host-initiated interface power management
           *    Phy event counters
           *    unknown 76[12]
           *    unknown 76[15]
                Non-Zero buffer offsets in DMA Setup FIS
                DMA Setup Auto-Activate optimization
                Device-initiated interface power management
                In-order data delivery
           *    Software settings preservation
                unknown 78[7]
                unknown 78[10]
                unknown 78[11]
           *    SMART Command Transport (SCT) feature set
           *    SCT LBA Segment Access (AC2)
           *    SCT Error Recovery Control (AC3)
           *    SCT Features Control (AC4)
           *    SCT Data Tables (AC5)
Security:
        Master password revision code = 65534
                supported
        not     enabled
        not     locked
                frozen
        not     expired: security count
        not     supported: enhanced erase
        120min for SECURITY ERASE UNIT.
Checksum: correct
which indicates that the drives are reporting to the host that they are 6TB drives.

That's all I have so far. I'll post back when I have more.
 
Since it is just these drives that seem to not be working due to the reported sector size, I don't think it would be fair to say that the unit can't accept drives >4tb.

I'm going to try these 6tb drives in an esata dock on a win7 system and see how they shake out. While that's running, I'm going to see if I can't get my 4x 2TB drives to be recognized again in the unit since I still know their positions and they're still formatted for the unit.

Once I have tested the 6tb drives with the win7 system, I'll see if I can't connect it to the unit via esata or usb just to see if they show up. I fully expect them to this way.
 
Last edited:
It's pretty amazing how quickly the unit recognizes a set of existing drives and goes back to a ready state. I just put the other drives back in and booted up and the whole system is back online as if nothing ever happened. :)

Checking the event log under settings, it's the same log that was originally for this set of drives, so the log is written to the drives vs the dom.
 
So a 6TB drive formatted as a 2TB MBR NTFS volume mounted fine when in a startech SATDOCK2REU3 usb 3.0 cloning dock. dmesg had this to say:
Code:
usb 1-3: new high speed USB device using ehci_hcd and address 5
usb 1-3: configuration #1 chosen from 1 choice
scsi9 : SCSI emulation for USB Mass Storage devices
usb-storage: device found at 5
usb-storage: waiting for device to settle before scanning
scsi 9:0:0:0: Direct-Access     HGST HUS 726T6TALE6L4     VKGN PQ: 0 ANSI: 0
sde : very big device. try to use READ CAPACITY(16).
sde : READ CAPACITY(16) failed.
sde : status=0, message=00, host=5, driver=00
sde : use 0xffffffff as device size
SCSI device sde: 4294967296 512-byte hdwr sectors (2199023 MB)
sde: Write Protect is off
sde: Mode Sense: 03 00 00 00
sde: assuming drive cache: write through
 sde: sde1

The same drive when formatted as a 6TB GUID NTFS volume failed to even show up in dmesg. That drive wouldn't show up via esata in a kingwin ez-dock esata/usb 2.0 dock (discontinued), and the drives apparently went doa (won't power back up) after being shutdown by the ss4200 as a usb drive as it didn't spin up in the kingwin or even the startech anymore. I've tried every combination of things I have to power it back up short of putting it inside a system.

The other 6TB GUID NTFS did not show up either via esata, but dmesg did have this to say which was similar to the message when the drive was installed interally:
Code:
ata6: waiting for device to spin up (8 secs)
ata6: soft resetting port
ata6: SATA link up 3.0 Gbps (SStatus 123 SControl 300)
ata6.00: ATA-9, max UDMA/133, 11721045168 sectors: LBA48 NCQ (depth 31/32)
ata6.00: ata6: dev 0 multi count 0
ata6.00: configured for UDMA/100
ata6: EH complete
scsi 5:0:0:0: Direct-Access     ATA      HGST HUS726T6TAL VKGN PQ: 0 ANSI: 5
sde : very big device. try to use READ CAPACITY(16).
sde : unsupported sector size -189857792.
SCSI device sde: 0 512-byte hdwr sectors (0 MB)
sde: Write Protect is off
sde: Mode Sense: 00 3a 00 00
SCSI device sde: drive cache: write back
sd 5:0:0:0: Attached scsi disk sde

I don't know if these drives are a conclusive test because they are not reporting a valid sector size. Just for the heck of it, I tried connecting a 10TB MBR 4x 2TB FAT32 1x 1.5TB FAT32 drive to the unit. The drive didn't show up, but dmesg had this to say about it:
Code:
grow_buffers: requested out-of-range block 18446744071562067968 for device sde
isofs_fill_super: bread failed, dev=sde, iso_blknum=17, block=-2147483648
and this repeated a whole page or so until I disconnected it. This particular drive is formatted MBR with 4k sectors, so it has the capacity to be up to 16TB as an MBR drive. It sounds like the kernel did attempt to increase the amount of buffers needed for the drive, but because of the limits in the kernel, it could not. I forgot to try this drive as it was from the factory. (I actually forgot about it when I was having a really hard time getting it to format MBR, which was the reason I got them in the first place.)

So the results are inconclusive on 6TB drives. I will wait until I can get my hands on some other drives and see if they will report a correct sector size. My guess is that beyond a certain size, there won't be enough buffers for the drive to be recognized, but at this point, there's something going on with the sector size identification.

If you're reading this and have some 6TB+ drives, get in touch with me if you'd let me try them out. I have a UPS account so I can cover shipping both ways. :)
 
I should be getting another set of larger drives this week to try large drive support again.

In the meantime, I purchased a lot of smaller ssds for system upgrades and decided to take 4 of the 128gb varieties and try them in the ss4200 to see if the unit will exceed 100MB/s with 4x 500MB/sec ssds installed as striped mirror.

It's at 6% of initializing the disks so it will probably be 12hrs+ before I can begin testing, but this will be interesting to see for sure and tell conclusively if the unit's speed limits are due to its software design or hardware. Stay tuned...
 

Latest threads

Sign Up For SNBForums Daily Digest

Get an update of what's new every day delivered to your mailbox. Sign up here!
Top