Hi again,
For the AT download, I always use the one for the
RT-10U (top right on that page) -- it's basically the same unit, just single-stream wifi (150 Mb/s max) instead of the N12's dual-stream (300Mb/s max). I've done dozens of flashes with that firmware and all have been solid; never a blip *knock on wood*.
")
As for the flashing process, I can't find a good guide off the top of my head, so I'll write one out for you. I'm going to stay high-level and assume you've at least got a bit of experience delving into and changing network settings... if anything reads like Chinese, just say so and I'll break it down further:
- Download the latest version of AT from the
RT-10U download page.
- Leave the router powered OFF for now.
- Assuming you're using a Windows PC of Windows 7 or higher, under "Network and Sharing Center" > "Change adapter settings" > Local Area Connection (double click) > Properties > IPv4 Properties, change the IP to manual, using 192.168.1.10 as your IP address and 255.255.255.0 as the subnet mask. You can leave the rest blank.
- Plug the ethernet cable into your PC but NOT into the router yet.
- Now to power on the router, but before doing so, make sure to depress and HOLD IN the Reset button with a paperclip, then press the power button, and CONTINUE holding the Reset button for 5-7 seconds until the Power light begins flashing on and off slowly -- this signals that you've put the unit into recovery mode.
- Now connect the ethernet cable to LAN1 of the router.
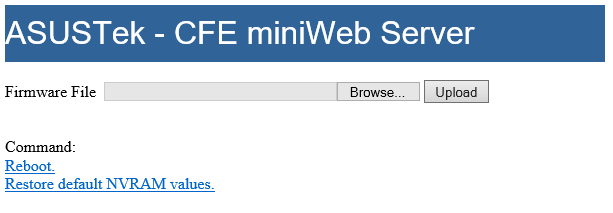
- Open up Internet Explorer and browse to 192.168.1.1, and you should see a very simple webpage that looks like this:
- Click the "Browse..." button to locate the AT firmware file you downloaded, select it, hit Open, then choose "Upload"
DO NOT TOUCH ANYTHING FOR AT LEAST 5 MINUTES. Take a walk, get a beer, shoot a squirrel, but whatever you do, don't touch it!
- Upon a successful flash, return to 192.168.1.1 in your browser, whereby you should be prompted to login to the newly-flashed Tomato interface
***If you *don't* get a good flash, or see the CFE recovery page but instead are brought back to the default Asus greeting page of the normal firmware, you'll have to repeat the depressed-Reset from cold power-on process I described above until you get to the CFE page, get a full upload and Tomato is loading normally. As long as you leave the upload alone for 5 minutes each time, you *shouldn't* brick the router. In a few cases, it's taken me 3 or 4 tries to get the CFE recovery page to show up, and to get an upload to stick, so don't despair if you don't get it the first time or two.***
- Use "admin" and "admin" for username and password, and you should be in.
- Before configuring anything, from the menu on the left, go to "Administration" > "Configuration" and choose "Erase all data in NVRAM (thorough)" from the "Restore Default Configuration" section of the page. Then choose "OK" and again wait the full 1.5 to 2 minutes it will take to clear NVRAM and reboot.
- Then browse back to 192.168.1.1 and proceed to apply the network settings appropriate to your network.
Network Setup:
Make sure on the N66U, your DHCP range starts from, say, 192.168.1.50 and ends at, say, 192.168.1.250, to leave some room for staticly-assigned devices, like the N12.
Then I'd assign the N12 a static IP of whatever number is sequentially available next in line from your router, but not identical to it (so if the N66U is 192.168.1.1, perhaps make the N12's IP 192.168.1.2.
After doing this, you'll have to browse back to "192.168.1.2" in your browser, as the IP of the web interface will no longer be reachable at "192.168.1.1".
Then just setup your wireless settings and make sure to turn off DHCP on the N12 (as it's handled by the 66U), and you should be done.
Then all that's left to do is plug the N12 into your Cat6 in the garage, and good to go.
")