Here are some notes that I put together for the way I set up SoftEtherVPN (SE) on my RT-AC86U.
First, some background that is worth mentioning in case you need to modify the following information to match your own needs.
I started using SE as my ISP hands out a private IP in the 10.10.0.0/24 range via DHCP. Therefore I needed a way to either use NAT Traversal or make use of a VPN Relay Server, both of which SE supports. If you get a static public IP or dynamic public IP as your WAN address, you are ahead of the game.
Some things of note:
- You can setup SE Server by using the SE Server CLI on the router, but requires knowing possibly a hundred or more command line commands. I use the optional Windows 10 SE Server Manger GUI. The GUI is also available for you apple folks as well. Life is a lot easier with the GUI.
- SE has its own NAT and DHCP (called Secure NAT). I don’t use either. My aim was to sign into my network and have complete access to all my network resources. I did not see any point in adding another layer of NAT and have to set up additional layer 3 routing.
- In order to use SE without using Secure NAT, you need to set up a TAP adaptor in SE (more on this later). To do so, you need the tun.ko kernel module. That module is not loaded by the router when its internal OpenVPN is turned off, therefore, the scripts below loads the module as required. In the scripts below, the directory where tun.ko is stored is for the 86U router. For your router, you will need to adjust the directory path as required.
- When installing SE, the installer installs a startup script in /opt/etc/init.d. You will need to move or delete that file as we will be creating our own script.
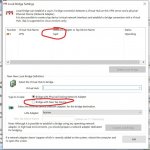
- By default, SE listens for traffic on 0.0.0.0. This works fine when using the Azure Relay Server, but NAT Traversal will not work as SE is listening to your internal router IP address instead of the WAN address. If your WAN address is static, then you can modify the SE Config file and change the ListenIP directive to your WAN’s static public IP. If you are like me and the WAN address changes when my router is off longer than the WAN DHCP lease time (which is 10 minutes), my script checks the current SE ListenIP directive against the WAN address and, if different, stops SE, modifies the config file, and restarts SE. This is why I call my startup script from the WAN-EVENT (connected) script – so that I can alter the SE config when my WAN address changes.
- Since I use NAT Transversal, I use port 443 for communications as most firewalls allow this port through. However, if you are using Diversion with PixelServe, this creates a problem and SE will not start as it can’t open port 443. If you don’t need port 443, you can use the SE Server GUI to tell SE to stop listening to port 443.
Installation of SoftEther VPN and configure it to work if you are behind a NAT.
- SSH into router and install SE
Code:
Opkg install softethervpn5-server
Opkg install softethervpn5-libs
SE gets started right away. No need to reboot.
2. Move or delete the file /opt/etc/init.d/S05vpnserver.
Note that if entware updates SE at any time, this file is recreated. You will need to remove it again.
3. On your computer (Windows or MAC), download the SE Server Manager and install
Initial setup
Before you can sign into SE from the SE Server Manager GUI, you need to set the SE Server admin password to something other than an empty password (default). We can also have SE run a simple test to ensure you can use SE on your router;
1. SSH into your router and issue the following commands;
Code:
cd /opt/libexec/softethervpn
./vpncmd
Once vpncmd opens, select 3 from the menu and then type “check”. If everything passes, great, moving on; type exit to exit vpncmd, then restart vpncmd again
This time select 1 and hit enter. When asked for an IP address and port, simply hit enter.
When asked for VPN Virtual hub name, press <Enter>
When asked for a password, press <Enter> (default password is empty)
Once you are in the server admin CLI, type “serverpasswordset” <Enter> and give your SE server a password.
Now SE has an admin password and you can use the GUI to manage your server.
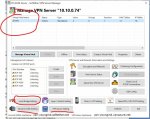
By default, SE listens on IP 0.0.0.0, so in SE Manger, select the router IP address as your server and select connect. Once connected, you can set up your default VPN Hub and select the “Layer2 Bridge” menu and create a tap adaptor called “tap0”. Note that the adaptor status may say “error”. This is normal if the tun.ko kernel module has not been installed.
If you need NAT Traversal or Azure relay, now is a good time to setup the DDNS and/or Azure setting with in SE Manager.
I will leave it up to folk to read the SE documentation on their website on how to setup your virtual server. The SE Manager has all the tool required to create a CA, Server, and Client certificates. I like a little more control, so I use XCA as my certificate manager for all my needs.
2. Create a Server Startup script. I called my script “vpn_server_start”. My scripts are in the next post.
3. I call the “vpn_server_start” script from the WAN-EVENT script when a “Connected” event happens. I do this because for NAT traversal to work, SE must be listening to the WAN IP and not the Router IP. SE Azure relay worked fine with SE listening on the Router IP. I don’t know if you need to set the SE ListenIP to the WAN IP for any public IP at the WAN port. If your WAN IP never changes, then you could call the script from the post-mount script.
The script does the following functions;
a) checks to ensure the USB drive is reachable (mounted);
b) checks the SE config file’s ListenIP directive against the WAN’s IP address. If the WAN IP address has changed, SE Server is shut down, then the ListenIP address is changed in the SE’s config file;
c) Start the SE Server, if it is not already running . If the SE Server needs starting, the script will fist load the tun.ko kernel module, if not already loaded
d) Add the Tap0 interface (created in the SE Server Manager) to the router’s br0 bridge and set the appropriate NVRAM is set.
4. Lastly, you will need to add the appropriate iptables commands in firewall-start script depending on how you want to use SE.
And that is it.
Once you set the ListenIP directive to an address other that 0.0.0.0, you will need to use the WAN IP address in SE Manager to connect to the SE Admin GUI.
You can shut down SE by issuing the following command
/opt/libexec/softethervpn/vpnserver stop
Note that doing so will also shutdown the tap0 interface and remove it from the br0 bridge, so to restart SE, use our custom “vpn_server_start” script to ensure the tap0 interface is added back to the br0 bridge.
For speed testing, I have tried Windows build in IPSec, p2p, and SSTP VPN client, however, the transfer speeds were awful (used ipferf3 between client and server). Using SoftEtherVPN’s client, I get transfer speeds very close to my ISP rated speeds (50 mbits/s) with both NAT Traversal and Azure Relay Server (which says a lot for the bandwidth going to/from Japan).
")