timevacuum
Occasional Visitor
I recently did an RMerlin upgrade and botched it. I can`t say for sure how but likely not resetting the router properly and unplugging the unit at a critical point. Tried the firmware recovery, setting IP on computer and holding reset. Twice, recovery loaded to about 80% then pooched. After a third try, recovery didn't even find the router anymore. No ping response either when start router normally or when go to recovery mode.
I tried wireshark and while I can't pretend to know even half of the stuff I was looking at, I could not see any IP other than the single computer that was connected to the router. There was a packet without an IP that seemed to have the router MAC address but I gave up on understanding what it was. It looked like some kind of IPv6 packet. If I were to do it again, I would skip wireshark and just use angryipscanner to tell if the router was available on the network.
My solution was based on this post by that1geek:
https://www.snbforums.com/threads/29077/
The difference is that I used a raspberry pi to get to the console so I would not have to order the ttl cable. The RPi's outputs are 3.3 V so no fancy cable required. BTW, I couldn't reach the console unless I booted to recovery mode. Once there, the same two commands that worked for that1geek worked for me and I did not have to reload anything over the serial connection (nvram erase then reboot).
Just in case you are asking why a person cannot use the serial DB9 connection on the back of your old desktop/laptop or use a normal USB to serial cable, these operate at a much higher voltage. You need 3.3 V serial for your router.
The internet searching took a lot longer than the solution so hopefully this write-up is easy enough to follow and saves you some time.
So to document the RPi solution:
If you want to find out more about RPi 3 serial communication, I used the following link for my information. There are quite a few other pages on the topic out there and most of these use changes to various configuration files to achieve the same goal. I used this one because it kept things simple and used the raspi-config menu based options for doing the serial setup. https://pimylifeup.com/raspberry-pi-serial/
This site has good background info on RPi serial coms: https://spellfoundry.com/2016/05/29/configuring-gpio-serial-port-raspbian-jessie-including-pi-3/
This site describes connecting via serial and RPi using minicom.
https://webventures.tweakblogs.net/blog/archief/2013/02/
Although I did not use much from the following site, it was the first one to put me onto using the RPi. It describes connecting via JTAG to the router using an RPi. The serial connection is simpler but the JTAG solution outlined here could be used if the serial solution did not work out.
https://www.experts-exchange.com/ar...er-in-2019-on-the-example-of-Asus-RT-N16.html
Good Luck and Thanks again to RMerlin for his hard work and effort. What a great piece of firmware.
Edit (19/05/15): When the device bricked originally, I tried alot of things in different orders but one thing that I may not have done before going to the serial connection was clearing settings using the PowerOn + WPS button after the factory reset. I do not know if I actually missed doing this or if this would have worked but it is a possibility. After factory reset, power off, hold down WPS button while turning your router on, hold WPS button for a while. Before anyone resorts to a serial connection, I would advise them to first follow the well laid out reset instructions at the bottom of Merlin's FAQ: https://github.com/RMerl/asuswrt-merlin/wiki/FAQ
I tried wireshark and while I can't pretend to know even half of the stuff I was looking at, I could not see any IP other than the single computer that was connected to the router. There was a packet without an IP that seemed to have the router MAC address but I gave up on understanding what it was. It looked like some kind of IPv6 packet. If I were to do it again, I would skip wireshark and just use angryipscanner to tell if the router was available on the network.
My solution was based on this post by that1geek:
https://www.snbforums.com/threads/29077/
The difference is that I used a raspberry pi to get to the console so I would not have to order the ttl cable. The RPi's outputs are 3.3 V so no fancy cable required. BTW, I couldn't reach the console unless I booted to recovery mode. Once there, the same two commands that worked for that1geek worked for me and I did not have to reload anything over the serial connection (nvram erase then reboot).
Just in case you are asking why a person cannot use the serial DB9 connection on the back of your old desktop/laptop or use a normal USB to serial cable, these operate at a much higher voltage. You need 3.3 V serial for your router.
The internet searching took a lot longer than the solution so hopefully this write-up is easy enough to follow and saves you some time.
So to document the RPi solution:
- Follow the disassembly instructions provided by 1geek upto step 8-ish. Obviously, you won't connect the cable in Step 9
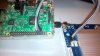
- Connect the AC68U to the Pi as follows with both Pi and Router depowered. This is very easy if you happen to have the female to female pin jumper wires as the AC68U already has the serial header pins installed. I read about someone using a breadboard in the middle as they only had F-M wires.
Code:Router RPi header GND Pin 6 (GND) TX Pin 8 (RX) RX Pin 10 (TX) (note the swap from TX to RX) - Fire up your Pi. Mine is a RPi 3 so some setup of the serial pins was required before going to the terminal window. The Serial IO needed to be enabled and the console function of the RPi needed to be disabled. This is easy to do on RPi 3 with Jessie:
Code:sudo raspi-config <5 Interfacing Options> <P6 Serial> would you like the login shell accessible over serial: <No> would you like serial port harware to be enabled: <Yes> - Accept and Finish
- Reboot your Pi
- Install Minicom and start it
Code:sudo apt-get install minicom sudo minicom -b 115200 -o -D /dev/serial0 - Power on the router holding reset until power LED blinks (~once every second) and release the reset button. You should see some action on your terminal window. Wait until the tftp attempts are started. I tried repeating Ctl-C at boot but this didn't work for me.
- Once you can see the tftp attempts on the console, press Ctl-C to get to the cfe> prompt
- At the CFE prompt run:
Code:nvram erase reboot - Watch the reboot on the RPi terminal window and wonder what all those messages mean.
- Wait till things settle down. My router was not connected to the internet at the time so I proceeded once I got to the reoccurring WAN leasefail messages.
- Connect a network cable to the router from your computer and browse to 192.168.1.1
- Login with the default user and pass (admin, admin)
- My router came back with the Merlin version that I had just uploaded however just to be sure, I downloaded and re-updated the router firmware.
If you want to find out more about RPi 3 serial communication, I used the following link for my information. There are quite a few other pages on the topic out there and most of these use changes to various configuration files to achieve the same goal. I used this one because it kept things simple and used the raspi-config menu based options for doing the serial setup. https://pimylifeup.com/raspberry-pi-serial/
This site has good background info on RPi serial coms: https://spellfoundry.com/2016/05/29/configuring-gpio-serial-port-raspbian-jessie-including-pi-3/
This site describes connecting via serial and RPi using minicom.
https://webventures.tweakblogs.net/blog/archief/2013/02/
Although I did not use much from the following site, it was the first one to put me onto using the RPi. It describes connecting via JTAG to the router using an RPi. The serial connection is simpler but the JTAG solution outlined here could be used if the serial solution did not work out.
https://www.experts-exchange.com/ar...er-in-2019-on-the-example-of-Asus-RT-N16.html
Good Luck and Thanks again to RMerlin for his hard work and effort. What a great piece of firmware.
Edit (19/05/15): When the device bricked originally, I tried alot of things in different orders but one thing that I may not have done before going to the serial connection was clearing settings using the PowerOn + WPS button after the factory reset. I do not know if I actually missed doing this or if this would have worked but it is a possibility. After factory reset, power off, hold down WPS button while turning your router on, hold WPS button for a while. Before anyone resorts to a serial connection, I would advise them to first follow the well laid out reset instructions at the bottom of Merlin's FAQ: https://github.com/RMerl/asuswrt-merlin/wiki/FAQ
Last edited:
 penwrt-15.05.1-brcm47xx-mips74k-asus-rt-n66u-squashfs.trx flash1.trx